
A reader opens a long tutorial looking for one particular step. The answer is somewhere on the page, but finding it requires scrolling past several sections they already understand.
A table of contents gives that reader a direct route to the information they need.
You can build a simple version in the WordPress block editor using headings and a linked list. The links point to specific sections of the same page, so readers can move through the article without opening another tab.
This guide explains how to create that navigation, test it, and handle a common problem: a sticky header covering the section you just selected.
When an Article Needs a Table of Contents
An outline is useful when readers may want to enter the article at different points.
Good candidates include:
- Tutorials with several distinct steps.
- Troubleshooting guides covering different problems.
- Detailed comparisons with clearly separated sections.
- Reference articles that readers revisit.
A short announcement or a brief answer may not need one. Adding navigation should make the page easier to use.
Place the contents list after a short introduction and before the first main section. This lets readers understand the purpose of the article before choosing where to go.
The method below creates a manual contents list. You control its wording and order, but you must update it when the article changes.
Step 1: Give the Article a Clear Heading Structure
Before adding links, check the article’s sections.
Use actual Heading blocks rather than bold paragraphs that only look like headings. Main sections will usually use H2, with H3 for subsections inside them. The post title normally supplies the page’s H1.
WordPress explains heading levels and how to inspect the outline in its Heading block documentation.
For this walkthrough, imagine an article about preparing images for WordPress with these main sections:
- Choose the Right Image Dimensions
- Compress the Image
- Upload It to WordPress
- Check the Published Page
Those four sections provide enough structure for a compact contents list.
You do not need to include every small subsection. Start with the main sections and add detail only when it helps someone navigate.
Step 2: Give Each Destination an HTML Anchor
An HTML anchor identifies the block you want a link to reach.
Select the first destination heading. Open the editor’s settings sidebar, make sure you are viewing the selected block’s settings, and expand Advanced. Enter a short identifier in HTML Anchor.
For the first example heading, use:
choose-dimensions
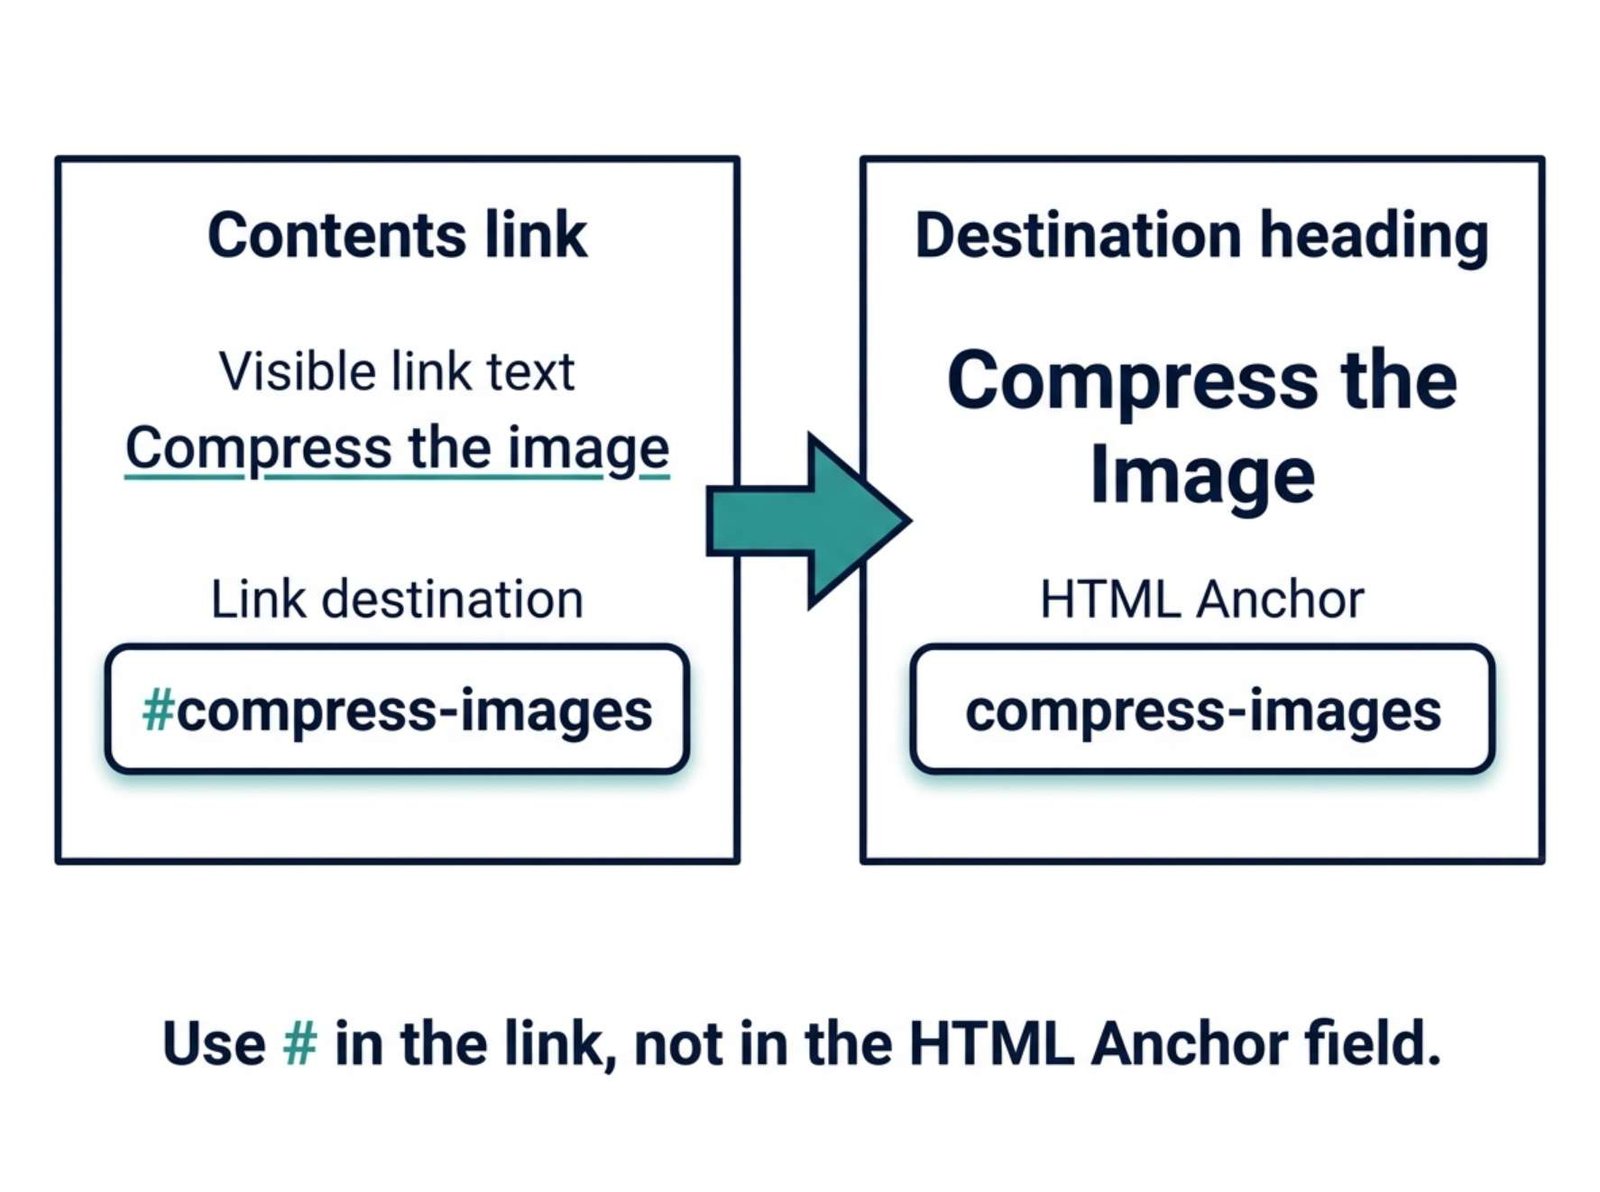
Enter the identifier without a # symbol.
Repeat this for the remaining headings:
| Heading | HTML Anchor field |
|---|---|
| Choose the Right Image Dimensions | choose-dimensions |
| Compress the Image | compress-images |
| Upload It to WordPress | upload-images |
| Check the Published Page | check-published-page |
The WordPress Advanced Settings guide explains where the anchor field appears. If the sidebar is hidden, open it with the editor’s Settings button.
Use short lowercase words separated by hyphens. Start with a letter, avoid spaces, and give every destination a different identifier.
Keep spelling and capitalization consistent: anchors are case-sensitive. WordPress describes these conventions in its page-jump documentation.
Step 3: Create the Contents List
Return to the end of your introduction.
Add a short label such as “On this page”, followed by a List block. Enter a readable label for each destination:
- Choose the right image dimensions
- Compress the image
- Upload it to WordPress
- Check the published page
Use wording that makes the destination clear. “Step 2” alone gives readers less information than “Compress the image.”
A bulleted list works well when readers can visit sections independently. A numbered list can suit a process that follows a specific order.
The standard List block supports both formats. See the WordPress List block guide.
Keep the list in one column on narrow screens. There is usually no reason to turn four links into a complicated layout.
Step 4: Link Each Item to Its Heading
Select the text of the first list item and open the link control. You can use the toolbar’s link button or press Ctrl + K on Windows or Command + K on Mac.
For the first item, enter:
#choose-dimensions
Confirm the link, then repeat for the other items:
| Contents item | Link destination |
|---|---|
| Choose the right image dimensions | #choose-dimensions |
| Compress the image | #compress-images |
| Upload it to WordPress | #upload-images |
| Check the published page | #check-published-page |
The difference matters:
- The heading’s anchor field contains
compress-images. - The link pointing to it contains
#compress-images.
The # introduces the section identifier in the link. WordPress documents this connection in its page-jump instructions.
Leave these links opening in the same tab. Readers are moving within the article they already have open.
For help changing an existing link, see the WordPress link-control documentation.
Step 5: Test the Page Outside the Editor
Save your changes and open the article preview in a separate browser tab.
Test the rendered page rather than relying on clicks inside the editing canvas, where selecting text may open editing controls.
For each contents item, check three things:
- The link moves to the intended section.
- The destination heading remains visible.
- The surrounding text makes sense as an entry point.
Watch the browser address bar. Selecting the compression section should add #compress-images to the page address.
After publishing or updating the article, repeat the check on its public URL. Open it in a private browser window to see the page without your WordPress administrator toolbar.
Also test on a phone. A contents list that works on desktop may still have cramped links or a heading hidden beneath the mobile menu.
Near the bottom of a page, the browser may be unable to place a heading at the very top because there is not enough content below it. That alone does not mean the link is broken.
Step 6: Fix Headings Hidden Behind a Sticky Header
Some themes keep the navigation menu fixed at the top of the screen. An anchor link may reach the correct section while leaving its heading behind that menu.
If this happens, add a scroll offset to the destination headings.
First, select each linked Heading block. Under Advanced → Additional CSS class(es), add:
article-jump
Do not include a dot in that field. If the field already contains another class, keep it and add the new class separated by a space.
Then add this CSS to your site’s custom CSS area:
.article-jump {
  scroll-margin-top: 120px;
}
Here, the dot identifies a CSS class. The rule applies to blocks carrying article-jump.
The 120px value is a starting example. Adjust it to leave enough room for your header and a small visible gap. Test desktop and mobile because their menu heights may differ.
This property controls the scroll margin; it does not insert a permanent blank space above every heading. See the MDN reference for scroll-margin-top.
Where to Put the CSS
For a classic theme, the usual location is:
Appearance → Customize → Additional CSS
Paste the complete rule beneath any existing CSS, then publish the change. WordPress describes this option in its custom CSS documentation.
For a block theme, open:
Appearance → Editor → Styles
Use the Styles options menu to find the site-wide Additional CSS editor. The precise placement can vary by WordPress version. See the Styles documentation.
Use the site-wide CSS field for the complete rule shown above. Some individual block CSS fields expect only properties and values.
Reload the public article and test again. If your site uses caching, clear the relevant cache when the updated styling does not appear.
Troubleshoot a Link That Does Not Work
Start by comparing the link destination and the heading’s anchor field character by character.
| Symptom | What to check |
|---|---|
| The address changes but the page does not reach the section | The link may name an anchor that does not exist |
| The link reaches a different section | Two blocks may share the same anchor |
| A section link stops working after editing | The anchor may have been changed or removed |
| The heading is hidden after the jump | Check the sticky-header offset |
| The link opens another page | Check whether a full URL was entered accidentally |
| Changes appear in the editor but not publicly | Confirm that you saved the update and check caching |
Duplicating a heading block deserves special attention. Check its anchor afterward instead of assuming the duplicate received a new identifier.
If the settings look correct but scrolling still behaves unexpectedly, your theme or another tool may be controlling anchor navigation. Investigate that interaction on a staging copy before changing site-wide behavior.
Keep the Contents List Updated
A manual table of contents does not automatically follow your edits.
When you add, move, or delete a section:
- Update the corresponding list item.
- Keep the list in the same order as the article.
- Remove links to deleted destinations.
- Test any new links.
You can revise a heading’s visible wording while keeping its existing anchor. That helps preserve links people may already have saved or shared.
For example, changing “Compress the Image” to “Compress the Image Without Losing Detail” does not require replacing the identifier compress-images.
Treat the anchor as a stable destination whenever the section still serves the same purpose.
Make the Navigation Easy to Use
Keep contents links visually recognizable as links. Avoid styling that makes them indistinguishable from ordinary text.
Use comfortable spacing between items, especially on mobile. Check that long labels wrap cleanly without creating horizontal scrolling.
Try keyboard navigation as well: use Tab to reach the links and Enter to activate them. The focused link should be visible so readers can tell where they are.
For a particularly long article, an occasional “Back to contents” link can help. Give the contents heading its own unique anchor and link back to it using the same method.
Final Check Before Publishing
Your table of contents is ready when every link reaches the right section, the destination headings remain visible, and the labels accurately describe the article.
Keep the implementation simple: clear headings, stable anchors, and a readable list. The result should help readers find the answer they came for without making the page harder to maintain.