
A video can look perfectly acceptable in a small preview and become difficult to follow when someone opens it full screen. Menu labels turn soft, subtitles develop rough edges, and a moving cursor leaves a distracting trail.
For a tutorial, those details matter more than an impressive reduction in file size. A smaller file is useful only if viewers can still understand what you are showing.
This guide explains how to create a smaller viewing copy in HandBrake, compare settings using a short sample, and calculate a starting bitrate when an upload has a strict size limit.
The worked example uses a hypothetical five-minute screen recording. It is a repeatable workflow, not a claim about measured compression results.
Decide What the Smaller File Needs to Do
Before changing any settings, identify the reason for compression.
Are you sending a preview to a colleague? Uploading through a slow connection? Trying to stay below an attachment limit?
These situations require different decisions:
| Your goal | What to prioritize |
|---|---|
| Share a tutorial with small interface labels | Readable text and intact screen edges |
| Send a rough preview for feedback | Manageable size and clear speech |
| Fit under a fixed upload limit | Duration, total bitrate, and final file size |
| Keep a copy for future editing | Preserve the original separately |
For this workflow, assume the source is a 1920 × 1080, 30 fps, standard dynamic range screen recording with spoken narration.
HDR footage, vertical video, and recordings with multiple audio tracks need additional attention. Do not apply the example settings to those files without checking their requirements.
Keep your original file. Give the compressed version a different name, such as tutorial-sharing-copy.mp4.
Set Up a Sensible First Export
Open your video in HandBrake and select Fast 1080p30 as a starting preset.
HandBrake describes this preset as a broadly compatible option for beginners. Presets can change resolution, frame rate, and audio settings, so inspect what the preset selects before encoding. A 1080p30 preset can reduce a higher-resolution or higher-frame-rate source. HandBrake’s official preset documentation
For the example recording, use this starting configuration:
| Setting | Starting choice |
|---|---|
| Container | MP4 |
| Video encoder | H.264 (x264) |
| Output dimensions | Preserve 1920 × 1080 |
| Frame rate | Preserve the source’s 30 fps |
| Quality mode | Constant Quality |
| RF value | 22 |
| Audio | AAC, 128 kbps for this narration example |
| Destination | A new file, separate from the original |
These are starting choices for this particular example, not universal best settings.
Check the picture preview carefully. If automatic cropping removes a taskbar, a menu, or another useful part of the screen, disable cropping or set the crop values to zero. For a full-screen tutorial, every edge may contain information.
Avoid adding sharpening or noise reduction during the first comparison. Changing several controls together makes it harder to understand which setting caused a visible difference.
Understand the Quality Number Before Changing It
With H.264 (x264), a lower RF number means higher quality and usually a larger file. A higher number means lower quality and usually a smaller file.
HandBrake recommends an RF range of 20–24 for 1080p video when using x264 or x265. Starting at 22 gives you room to compare in either direction. These numbers are not directly interchangeable across different encoders. HandBrake’s quality settings guide
For this exercise:
- Try RF 20 if fine text looks damaged.
- Start with RF 22 for the first sample.
- Try RF 24 if the first sample looks good and you want to explore a smaller output.
Keep the encoder and other settings unchanged during the comparison.
Constant Quality does not promise a specific file size. Different recordings need different amounts of data to retain detail. A static slide and a moving scene can produce very different outputs even when their duration and settings match. HandBrake’s explanation of quality and bitrate modes
Compare Thirty Seconds Before Encoding Everything
Choose a section that contains the most demanding material in your video.
For a screen tutorial, look for:
- The smallest text viewers need to read.
- A scrolling page or moving cursor.
- A menu opening over another window.
- A spoken explanation that must remain synchronized with the picture.
Do not use a static title card as your only test.
HandBrake’s Range controls let you select part of a video using seconds. For example, a range from 60 to 90 seconds selects a thirty-second segment beginning one minute into the recording. HandBrake’s point-to-point encoding guide
Encode the same segment three times:
| Sample filename | Quality setting | Purpose |
|---|---|---|
sample-rf20.mp4 |
RF 20 | Compare a higher-quality option |
sample-rf22.mp4 |
RF 22 | Establish your starting reference |
sample-rf24.mp4 |
RF 24 | Explore a smaller-file option |
Open the samples in the same player and use the same playback size. Watch them in motion, then pause on the same frame to inspect difficult details.
Record the actual file sizes yourself. There is no reliable universal table saying that RF 22 will shrink every recording by a particular percentage.
Also avoid multiplying a sample’s size by the full video’s duration and treating the answer as exact. The rest of the recording may contain more or less complex material.
Judge the Details That Make the Tutorial Useful
A compression comparison should answer specific questions.
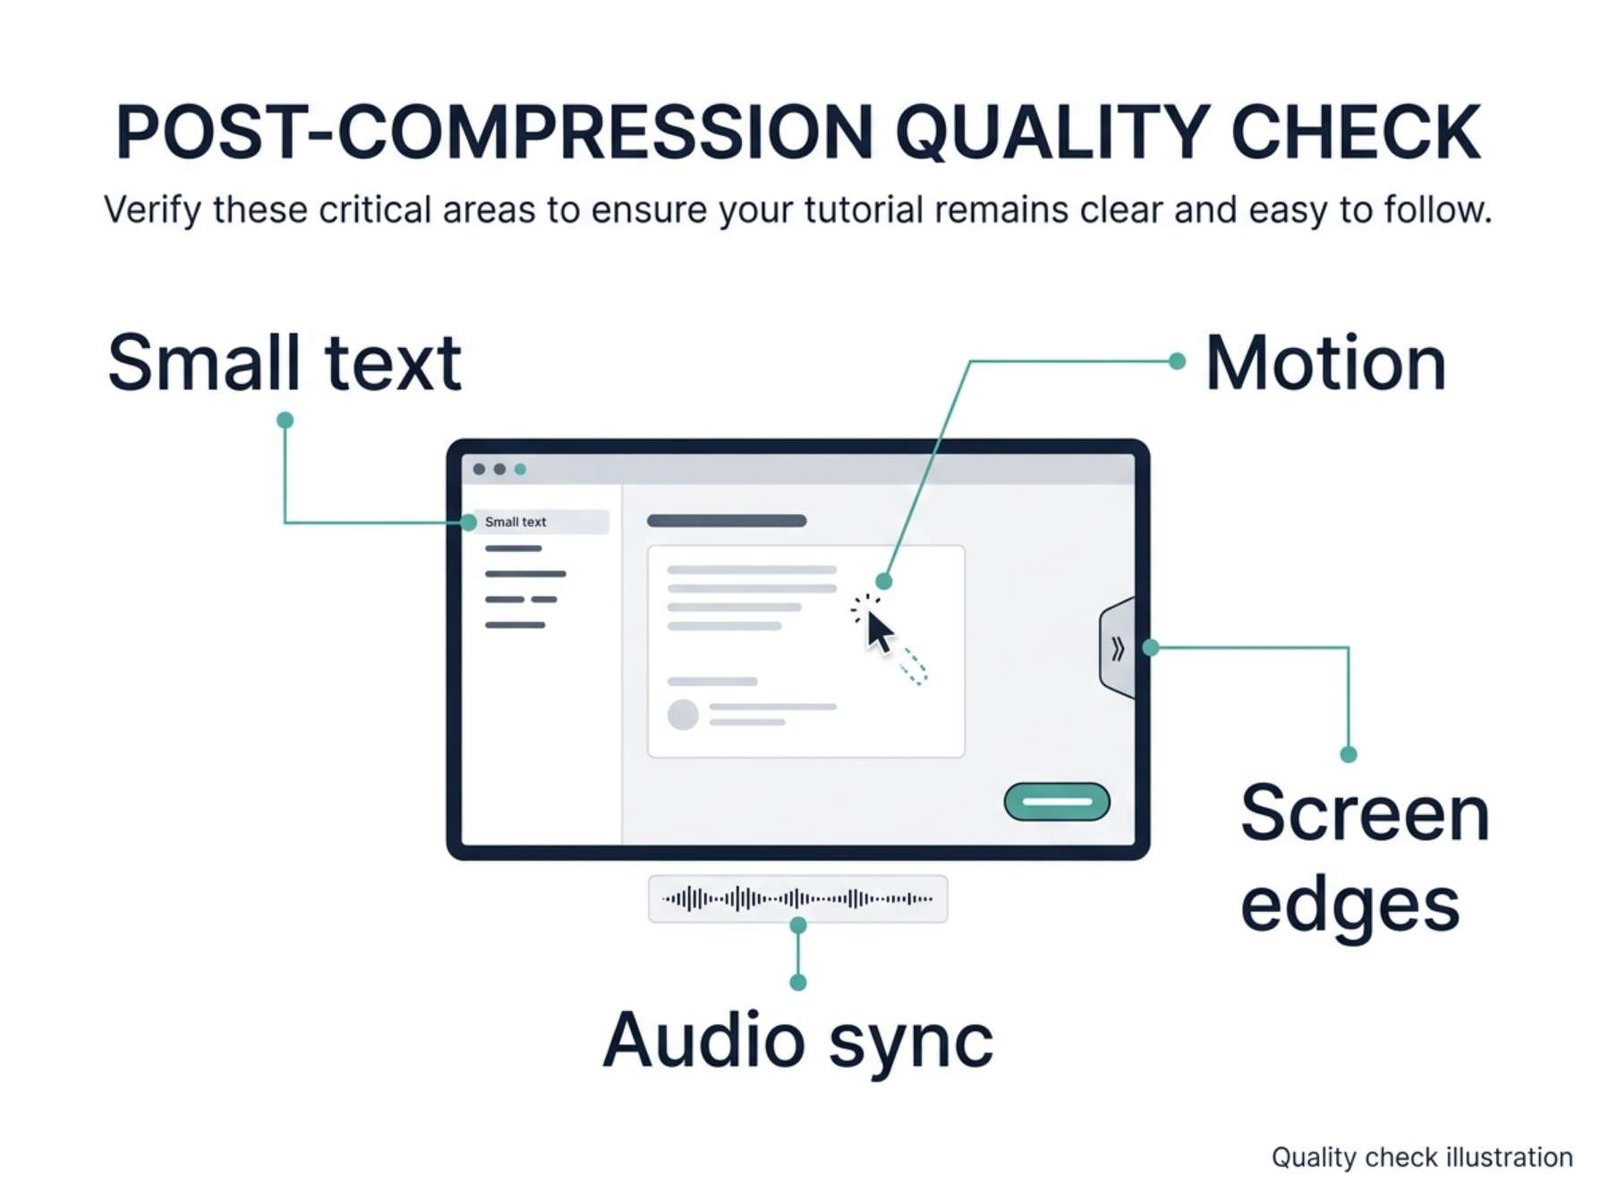
Can you read the smallest necessary label?
Check the words a viewer needs to follow the instructions. A large heading staying sharp tells you little about a small dropdown menu.
Can you follow the action?
Watch cursor movement and scrolling. A paused frame cannot reveal every motion problem.
Are the screen edges intact?
Verify that buttons, notifications, and captions near the edges remain visible.
Does the audio still explain the action clearly?
Listen to a complete sentence. Check for missing narration, distracting artifacts, and an obvious delay between the voice and the action.
Use the results to decide what to change:
| What you notice | What to try next |
|---|---|
| Text is clear at RF 22, but visibly damaged at RF 24 | Keep RF 22 |
| Text is damaged at RF 22 | Test RF 20 using the original source |
| Text is already unreadable in the original | Enlarge the interface or rerecord that section |
| The output has missing screen edges | Check cropping and dimensions |
| Picture quality is acceptable, but the file exceeds a limit | Calculate a bitrate budget |
| The sample works locally but fails on the receiving device | Check that device’s supported formats |
These are decision rules, not measured results from a specific recording.
When the Video Must Fit Below a Size Limit
A hard upload limit changes the task. You need to budget the data used by both video and audio.
A useful approximation is:
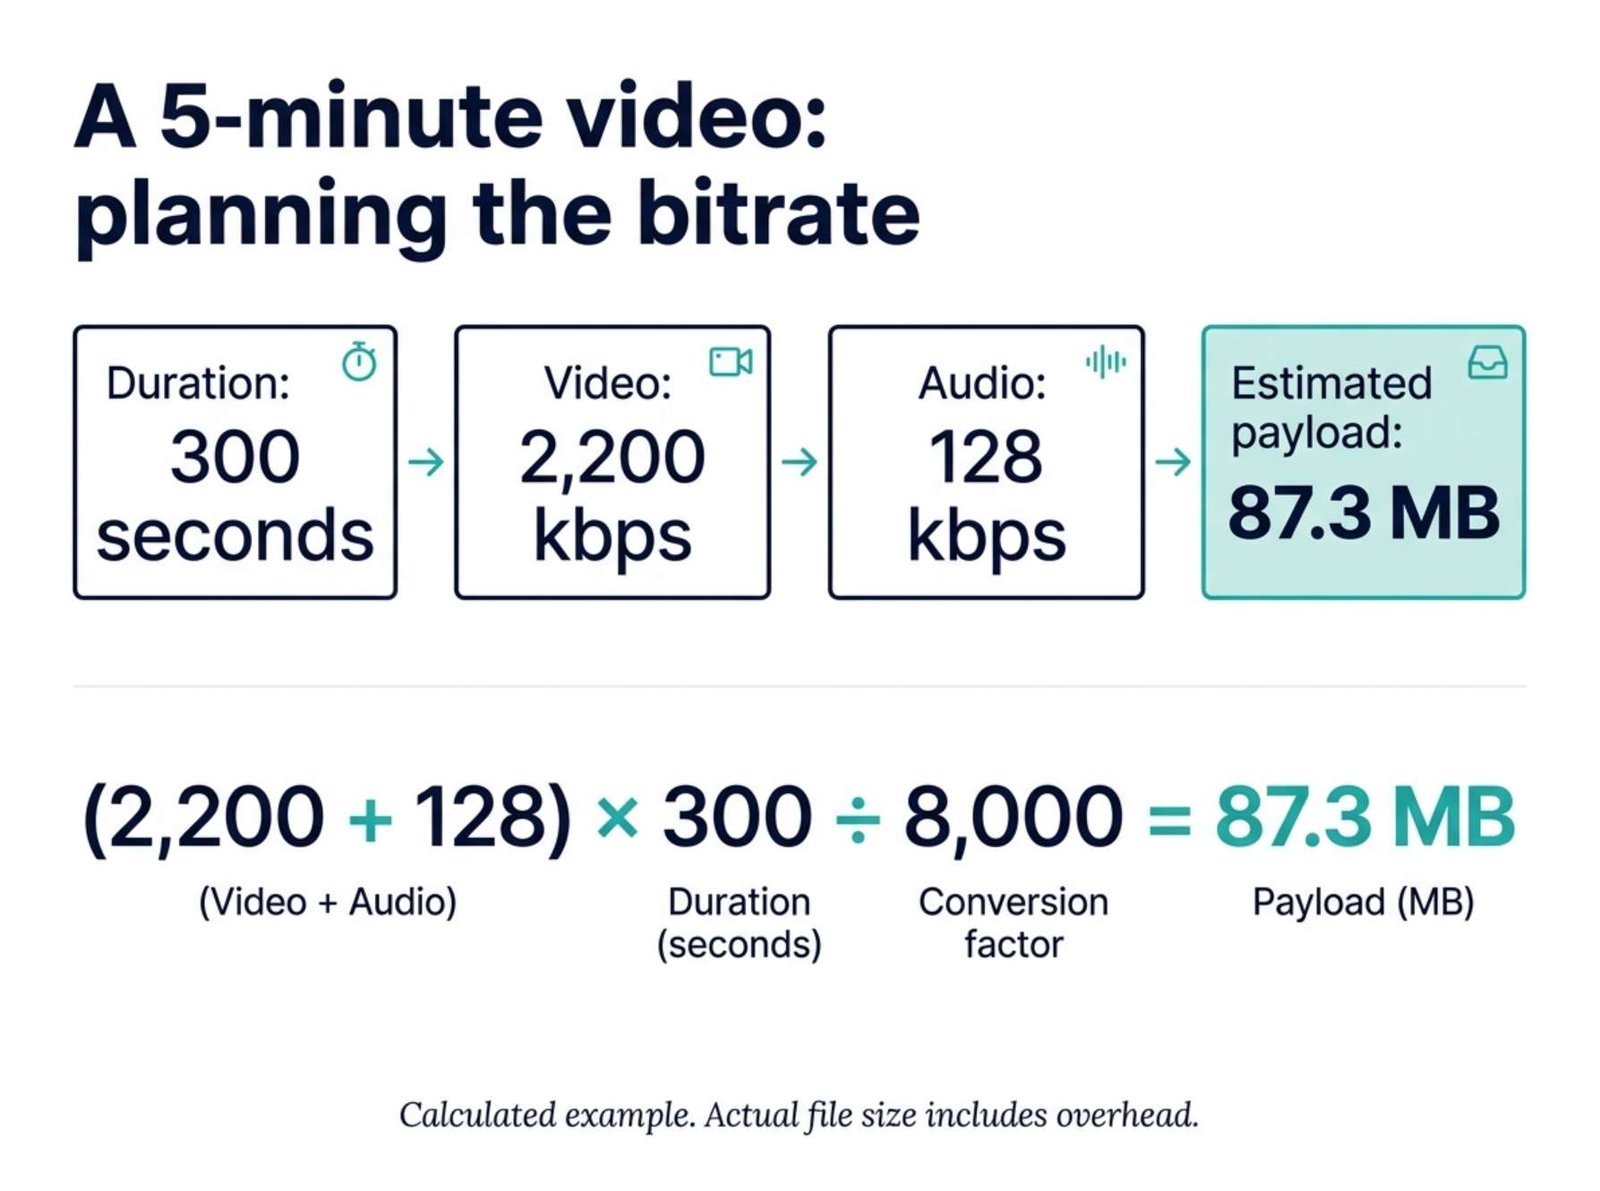
File size in decimal MB ≈ total bitrate in kbps × duration in seconds ÷ 8,000
Suppose your five-minute video must fit below 100 MB.
Instead of targeting the limit exactly, use 90 MB as a planning target:
90 × 8,000 ÷ 300 = 2,400 kbps total
If you allocate 128 kbps to one AAC audio track:
2,400 − 128 = 2,272 kbps available for video
A starting video bitrate of 2,200 kbps leaves a little additional room. The estimated video and audio payload would be:
(2,200 + 128) × 300 ÷ 8,000 = 87.3 MB
That is a calculation, not an actual exported file size. Container overhead, bitrate variation, additional tracks, and differences in how services define MB can affect the result.
In HandBrake, switch from Constant Quality to Avg Bitrate, enter the video bitrate, and enable Multi-Pass Encoding if available for the selected encoder. Average bitrate is useful when controlling size is the priority, but it does not guarantee that every scene will look good. HandBrake’s bitrate documentation
Keep the example’s single audio track at the planned bitrate. Then encode the full video and check its actual size.
If the quality is unacceptable, consider shortening the recording or sharing a download link. Reducing resolution is another option, but it can make small interface text harder to read.
Why the Compressed File Might Be Larger
Sometimes the new file is larger than the original.
This does not automatically mean HandBrake failed. The original may already use efficient compression, while your new settings request more data than it currently contains.
An extremely high-quality setting cannot restore detail that was lost before you received the file. It may simply create a larger version of the same imperfect picture.
Before trying again, ask whether compression is necessary. If the original already meets the destination’s requirements, another conversion may offer little benefit.
If you do make another attempt, return to the original source. Avoid creating a chain of compressed copies, each made from the previous one.
Check the Complete File Before Sharing
Once you select your settings, restore the Range controls to the full video. Otherwise, you may accidentally export only your test segment.
After encoding, check:
- The duration matches the intended recording.
- The file meets any upload limit.
- The beginning, middle, and ending play correctly.
- Narration is present and synchronized.
- Required subtitles or captions are included.
- Small text remains readable at the expected viewing size.
Finally, open the file on the device or service your audience will actually use.
The useful result is a file that travels more easily while still showing viewers what they need to see. For a tutorial, readable instructions are a better stopping point than the smallest file you can produce.