
A missing word in a caption can change an entire instruction. “Do not delete the original file” becomes dangerous advice if the word “not” disappears.
For a tutorial, accurate captions help viewers follow software names, settings, keyboard shortcuts, and steps that might otherwise be difficult to catch. They also make spoken instructions available to people who cannot hear the audio.
This guide covers captions for prerecorded YouTube videos using YouTube Studio. You will learn how to correct an automatic track, upload an existing caption file, and check whether the finished captions work alongside your video.
The examples below are constructed teaching examples, not results from a captioning accuracy test.
1. Understand What You Are Adding
Three things are easy to confuse:
- A transcript is the written version of the audio without synchronized display times.
- A caption track contains text synchronized with the video, including meaningful sound information.
- Burned-in captions are permanently rendered into the video image.
Closed captions can be switched on and off. Burned-in text cannot. W3C explains these differences in its guide to captions and subtitles.
For a YouTube tutorial, start with an editable closed-caption track. This gives you a separate place to correct wording and timing.
If your video already includes large animated words, preview it with closed captions enabled. Two sets of text may compete for the same space.
This walkthrough focuses on captions in the language spoken in the video. Translate the reviewed version later if you want to serve another language audience.
2. Finish the Video Edit Before Reviewing Captions
Caption the version you intend to publish.
Removing an introduction, shortening a pause, or replacing a demonstration can change where words occur. A caption file prepared for an earlier edit may no longer match the finished video.
Before starting, prepare:
- The final video.
- Any script or recording notes.
- A short list of names and technical terms.
- Headphones for checking unclear speech.
Treat the script as a reference. If you changed a sentence while recording, the captions should follow the recording.
For example, your script might say:
Open Settings and choose Output.
But the finished narration might say:
Before opening Settings, stop the recording.
Pasting the original script would omit a step that the viewer actually hears.
For a software tutorial, a terminology list might include “OBS Studio,” “WordPress,” “WebP,” and the exact names of buttons shown in the recording. Keeping this list nearby makes repeated spelling checks easier.
3. Choose Your Starting Point
The best starting point depends on what you already have.
| What you have | Suggested approach |
|---|---|
| An automatic caption track | Review and correct it |
| An accurate transcript without timestamps | Use Auto-sync where available |
| A timed caption file from your editor | Upload the file |
| No usable transcript or caption track | Create captions manually |
Automatic captions are a draft. YouTube warns that accents, pronunciation, background noise, and other factors can produce transcription errors. They may also take time to appear after upload. See YouTube’s automatic captioning guidance.
Do not build your publishing schedule around an assumed processing time. If the automatic track is unavailable, use another method instead of repeatedly waiting for it.
Correct an automatic track
In YouTube Studio:
- Open Subtitles.
- Select your video.
- Find the automatic track for the spoken language.
- Choose Duplicate and edit.
- Correct the text and review the timing.
- Select Publish when the track is ready.
Editing automatic captions creates a new track containing your revisions. If prompted to overwrite an existing draft, check whether that draft already contains work you need. These controls are documented in YouTube’s caption editing instructions.
Use a transcript or upload a file
From the video’s Subtitles page, add the relevant language if necessary and choose Add under subtitles.
For a transcript, choose Auto-sync and enter or upload the words. The transcript must match the spoken language, which must be supported by YouTube’s speech recognition. Review the synchronization after processing. YouTube notes that this workflow can publish the track automatically once it is ready.
For a timed file, choose Upload file → With timing, select the file, and save. You can also use Type manually to enter captions in Studio.
YouTube explains these options in its guide to adding subtitles and captions.
4. Check Words That Can Change the Instruction
Read the captions while listening to the video. Start with mistakes that could lead someone to perform the wrong action.
Pay particular attention to:
- Negatives: “not,” “never,” and “don’t.”
- Numbers: dimensions, percentages, durations, and version numbers.
- Units: pixels, megabytes, seconds, and frames per second.
- Product names and file extensions.
- Commands such as “delete,” “duplicate,” “replace,” and “export.”
Consider these invented examples:
| Spoken instruction | Incorrect caption | Why it matters |
|---|---|---|
| “Do not overwrite the source file.” | “Overwrite the source file.” | Reverses the instruction |
| “Set the width to fifteen hundred pixels.” | “Set the width to fifty hundred pixels.” | Changes the value |
| “Choose Save As.” | “Choose Save.” | Refers to a different action |
| “Export a WebP image.” | “Export a web image.” | Loses the file format |
Correct the caption to match what was actually said.
If the narration itself contains a mistake, changing only the captions creates conflicting instructions. Correct the video where possible, or provide a clearly identified correction that reaches viewers using either audio or captions.
For example, if the speaker says “fifty” but the intended setting is “fifteen,” quietly putting “fifteen” in the caption does not solve the problem for someone listening.
5. Break Text Into Readable Phrases
Accurate words can still be difficult to follow when they appear as a dense paragraph.
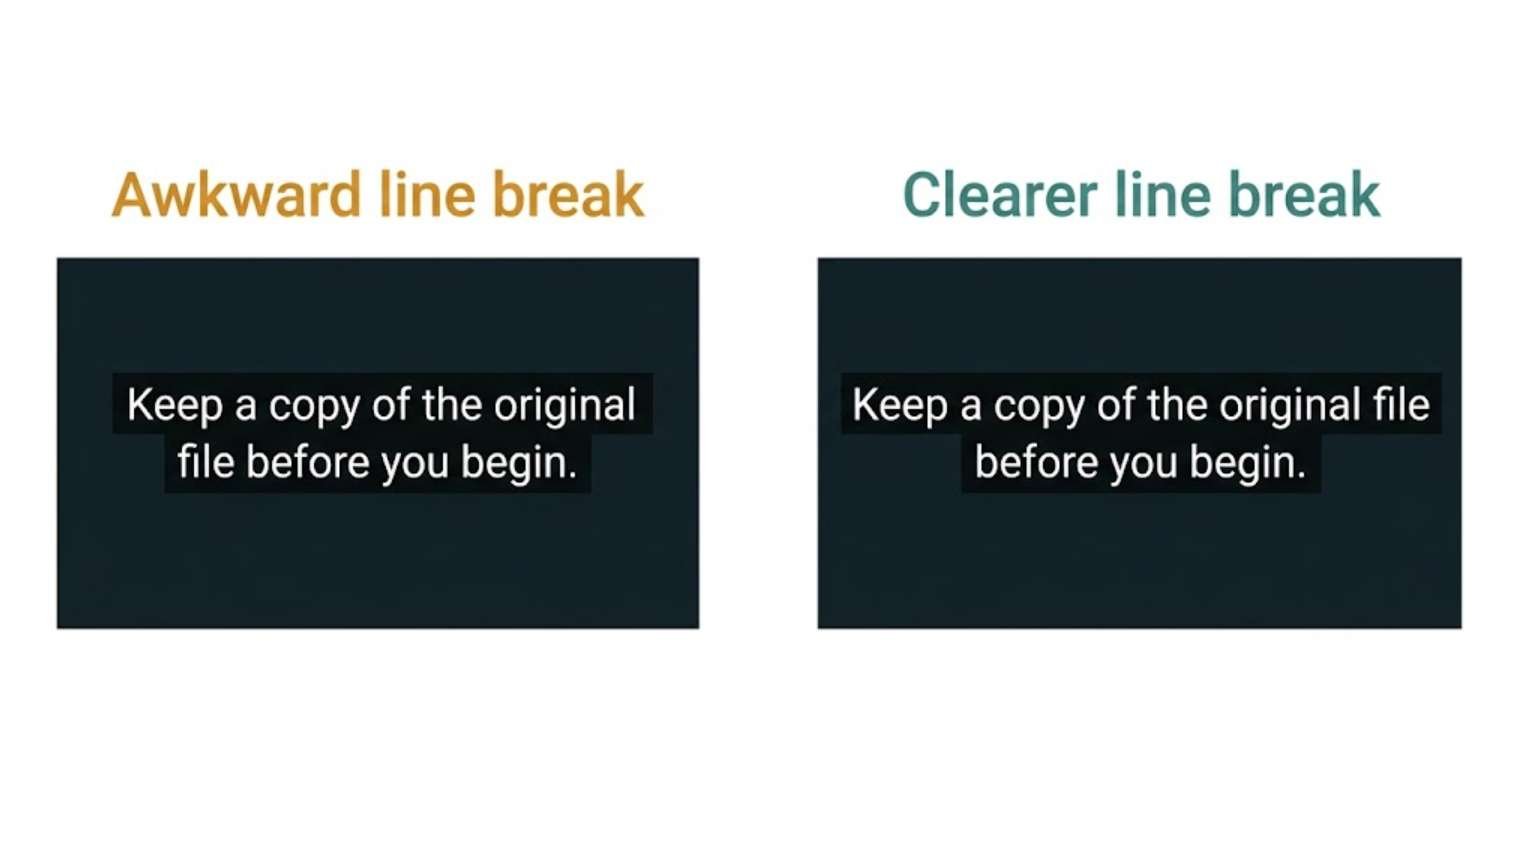
Aim for short, coherent chunks. As a practical starting point, keep captions to one or two lines and split at natural phrase boundaries. Section508.gov recommends readable display times and logical breaks in its captioning guidance.
Consider this sentence:
Before you upload the image, check its dimensions and keep a copy of the original file.
A useful division would be:
Before you upload the image,
check its dimensions.
Then, as the next phrase is spoken:
And keep a copy of the original file.
An awkward division would separate a word from the phrase it belongs to:
Before you upload the
image, check its
dimensions and keep a copy
of the original file.
The viewer has to hold unfinished fragments in memory while also watching the demonstration.
Preserve the speaker’s meaning. Caption editing should not turn an explanation into a promotional summary or add details that were never spoken.
For technical phrases, try to keep related words together. “Output resolution,” “Save As,” and “source file” are easier to recognize when they remain intact.
6. Match Captions to the Audio
A correct caption displayed at the wrong moment can point viewers toward the wrong step.
In YouTube’s caption editor, select a caption and adjust its start and end timestamps. If the timestamps are hidden, choose Edit timings. Publish the changes when finished. YouTube documents these controls in its timing instructions.
For each problem section, ask:
- Does the text appear when the corresponding speech begins?
- Does it disappear before an unrelated instruction starts?
- Is it visible long enough to read?
- Does it accidentally overlap the following caption?
Suppose a tutorial contains this sequence:
| Time in this hypothetical video | Narration |
|---|---|
| 00:12–00:15 | “Open the Output settings.” |
| 00:16–00:19 | “Choose a folder for your recordings.” |
| 00:20–00:23 | “Leave the original file unchanged.” |
If the last caption appears at 00:16, viewers see a warning about the original file while hearing an instruction about folders.
Check the sentence before and after every timing adjustment. Moving one caption can create a collision with its neighbor.
When speech is too fast to read comfortably, deleting essential instructions is a poor fix. During editing, consider slowing the explanation or adding a pause before the next action.
7. Include Sounds That Explain What Happens
Captions may need to communicate more than speech.
In a screen tutorial, a sound can explain why the presenter stops, reacts, or checks a setting. For example:
[error tone]
[notification chime]
In an interview, a speaker label can clarify an offscreen response:
Interviewer: Which setting did you change?
Use these descriptions when the information matters. Ordinary mouse clicks do not need individual captions throughout a demonstration.
A useful editorial question is: Would missing this sound make the next action confusing?
If a tutorial demonstrates the difference between two microphone recordings, labels such as “[steady background hum]” may help communicate the relevant sound. Avoid subjective replacements such as “[terrible audio]”; describe what is audible.
Keep labels consistent so viewers do not have to interpret a new style halfway through the video.
8. Use an SRT File When You Already Have Captions
You do not need to create a caption file by hand to use YouTube Studio. However, understanding the basic structure helps when an upload fails.
An SRT file contains numbered entries, start and end times, and caption text. YouTube supports basic SRT files saved as plain UTF-8 text, but does not recognize SRT styling markup. See its supported caption file formats.
Here is a small illustrative example:
1
00:00:02,000 --> 00:00:05,000
Open the folder containing your video.

2
00:00:05,500 --> 00:00:08,500
Keep a copy of the original file.

3
00:00:09,000 --> 00:00:12,000
Now import the copy into your editor.
These timestamps belong only to this example. Replace them with times that match your recording.
If you save a file manually, check that its name ends in .srt, rather than .srt.txt. Also check for missing blank lines between entries, malformed timestamps, and end times that occur before start times.
Do not assume that a successful upload proves synchronization. The file can be structurally valid while containing captions for a different edit.
9. Review the Finished Video in Two Passes
Use two separate viewing passes to make mistakes easier to notice.
Pass one: Listen and compare
Watch the entire video with audio and captions enabled.
Check the transcript against the recording, especially at transitions, technical explanations, and any section you rerecorded. Confirm that the closing sentence is included; do not stop checking after the main demonstration ends.
Pass two: Watch without sound
Mute the video and follow the captions alongside the screen.
For a tutorial, try to identify:
- What the viewer should do next.
- Which setting or file the instruction refers to.
- Whether an important warning appears at the right moment.
- Whether captions cover the button being demonstrated.
Also preview on a phone. A layout that looks spacious on a desktop monitor can become crowded on a smaller display.
If captions obscure an important control, reconsider the video composition while you can still edit it. Enlarging or repositioning the demonstration area may help more than shortening a necessary instruction.
This review is a practical usability check, not a complete accessibility assessment.
10. Verify the Published Track and Save a Copy
After publishing the captions, open the video’s watch page and select the intended language track. Confirm that you are viewing your corrected captions rather than an automatic version.
Recheck several places you changed, including one near the beginning and one near the end.
Download a copy of the reviewed track from the caption editor’s Options → Download subtitles menu. YouTube includes this process in its caption management instructions.
Keep the file beside the matching final video. For example:
screen-tutorial-final.mp4screen-tutorial-en-reviewed.srt
Use the actual extension of the downloaded file; changing an extension does not convert its format.
Before considering the job finished, confirm that the captions match the final edit, preserve important words and numbers, follow the audio, and remain readable alongside the demonstration. If you later create a shorter version of the video, review its captions against that new version before publishing.