
A Pinterest Pin can introduce someone to a useful article before they have ever heard of your website. But the image, headline, and destination need to work together.
If the Pin promises a checklist, the linked page should contain that checklist. If it advertises a tutorial, readers should arrive at the tutorial rather than a homepage where they must search for it.
This guide walks through creating one image Pin for one published blog article. You will choose a specific angle, plan a readable design, write the title and description, add the destination link, and check the finished result.
The worked example promotes a tutorial about recording clear screen videos in OBS Studio. You can adapt the same process to other practical articles.
The sample copy and layout are suggested starting points, not results from a tested Pinterest campaign.
1. Start with the Article and Its Reader
Before designing anything, open the article you want to promote.
Write down three things:
- Who the article helps.
- What problem it solves.
- What the reader can do after following it.
For the OBS tutorial, the answers might be:
| Question | Answer |
|---|---|
| Who is it for? | Beginners recording software tutorials |
| What problem does it solve? | Small or unclear interface text in screen recordings |
| What can the reader do afterward? | Prepare a readable frame, configure a recording, and test the result |
This gives the Pin a clear subject.
“Video production tips” is broad. “Record readable screen tutorials in OBS” tells someone what the page actually explains.
Check the article itself before making that promise. If the page mentions OBS briefly but does not explain the workflow, the Pin needs a different angle—or the article needs more useful detail.
Also confirm that the page is published and accessible without an administrator login. A draft preview is not an appropriate destination for readers.
2. Choose One Promise for the Pin
A long article may cover preparation, recording quality, audio, editing, and uploading. Putting every topic on the image usually creates a crowded design.
Choose one central promise and let the description supply context.
For the example article:
Main promise: Make screen tutorials easier to read.
Supporting detail: A practical OBS recording workflow.
Destination: The full tutorial.
Compare these possible headlines:
| Headline | What it communicates |
|---|---|
| Grow Your YouTube Channel Fast | A growth result the article does not establish |
| Video Tips You Need to Know | A vague subject with little reason to choose it |
| Record Clear Screen Tutorials in OBS | A specific task that matches the article |
| Tiny Text in Your Screen Recordings? | A recognizable problem that the article addresses |
The last two could support separate designs. Start with one.
Avoid adding claims such as “guaranteed results,” “perfect settings,” or a percentage improvement unless the article contains reliable evidence for that exact claim.
A clear promise makes the transition from Pin to article easier to understand.
3. Prepare a Vertical Design
For this walkthrough, use a 1000 × 1500 pixel canvas, which has a 2:3 aspect ratio.
Pinterest recommends that proportion for standard image advertising creative. Here, it serves as a practical design starting point for the organic image Pin in our example, rather than a claim that every Pin must use that size. See Pinterest’s creative guidance.
Build the image around three elements:
- A short headline.
- A relevant photograph or visual.
- A small website name.
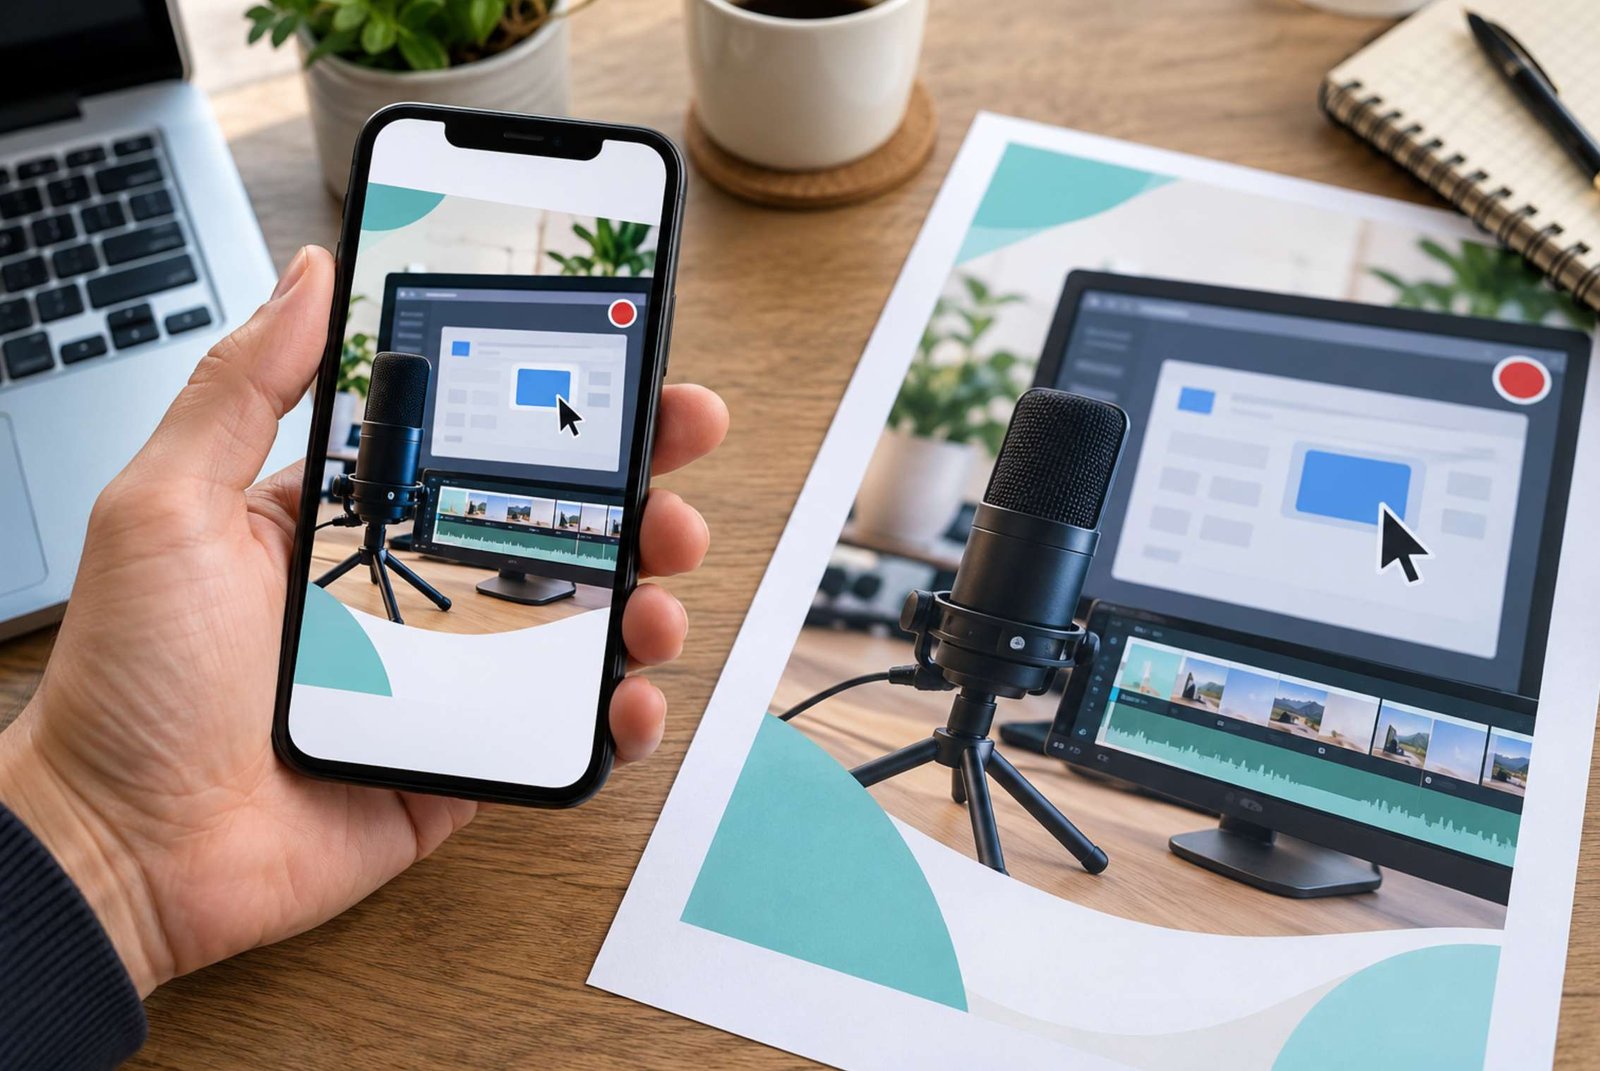
For the OBS example, a photograph of a screen-recording workspace can communicate the subject. Place the headline in a quiet area with sufficient contrast.
An illustrative layout might use:
- An upper area for “Record Clear Screen Tutorials.”
- A central photograph showing a monitor and microphone.
- A smaller supporting line such as “An OBS workflow for beginners.”
- A discreet website name near the bottom, with space around it.
This is an editorial layout suggestion, not an official Pinterest template.
Do not stretch a horizontal blog cover into a vertical shape. Crop it deliberately or create a separate composition.
Keep essential text away from the edges and inspect the uploaded preview for interface overlap or cropping.
4. Use a Visual That Fits the Subject
A photo should help someone recognize the topic.
For a screen-recording tutorial, relevant choices include:
- A person preparing a software demonstration at a computer.
- A close view of a monitor and recording microphone.
- A genuine screenshot of the relevant application, cropped to a readable area.
A scenic landscape might look attractive, but it would need additional explanation to connect it to OBS.
Choose a visual you created or have permission to use. If you use a screenshot, remove personal information and check that it represents the actual workflow described.
A photorealistic AI image can work as a conceptual cover. It should not be presented as a screenshot of software settings, proof of a test, or a photograph of your own recording session.
Pinterest’s current creation workflow includes options for identifying AI-modified content. If your uploaded creative uses AI-generated imagery, complete those fields accurately. Pinterest describes them in its Pin creation instructions.
For precise lettering, add the headline in a design editor after generating or selecting the background image. This makes spelling, spacing, and later revisions easier to control.
5. Check the Design at a Small Size
A Pin that looks impressive on a large design canvas may be difficult to read in a feed.
Export a draft and view it on your phone. Look at it without enlarging the image.
Ask:
- Can I identify the subject quickly?
- Can I read the main headline comfortably?
- Does the photograph support the message?
- Is any essential information hidden near an edge?
- Are there too many competing elements?
For example, this headline is too much to ask a small image to carry:
How to Record Software Tutorials with Better Text Readability, Audio, Editing, and Upload Settings
A shorter image headline could be:
Record Clear Screen Tutorials
The title and description can explain that the article uses OBS.
Keep the visual hierarchy simple. The main headline should be easier to notice than the website name or supporting line.
Avoid solving a crowded design by making every font smaller. Remove information that belongs in the article instead.
6. Write the Title and Description Separately
The words placed on the image and the Pin’s title field have related but different jobs.
The image headline needs to remain readable in the design. The title can state the subject more fully. The description can explain what the linked article covers.
Pinterest currently allows titles of up to 100 characters. Its Pin specifications also explain the supported file formats and description field.
Here is a complete copy example:
Image headline
Record Clear Screen Tutorials
Pin title
How to Record Clear Screen Tutorials in OBS Studio
Pin description
Recording a browser or software tutorial? Learn how to frame the important controls, keep interface text readable, choose practical OBS recording settings, and test a short sample before recording the full lesson. The guide also explains what to check after exporting and uploading.
These three elements describe the same destination without repeating identical wording.
Use terms your intended reader would naturally use. In this example, “OBS Studio,” “screen recording,” and “software tutorial” are relevant because they describe the article.
Avoid filling the description with loosely related phrases. A list such as “YouTube growth, viral videos, passive income, marketing secrets” would create expectations that the tutorial does not satisfy.
Read the description as a normal sentence. It should explain the article even if you ignore any possible discovery benefit.
7. Add Alt Text That Describes the Image
Alternative text helps people using screen readers understand the visual content.
Pinterest provides an alt-text field when creating Pins. Its accessibility instructions explain where to find it.
For the example design, suitable alt text might be:
A person preparing a screen recording at a desk with a monitor and microphone. The headline reads “Record Clear Screen Tutorials.”
Describe what is actually visible in your final design. If you use an illustration instead of a photograph, adjust the description.
Alt text should not become a second advertising paragraph. Avoid inserting unrelated keywords or claims about the article’s performance.
If the image contains important words, include the essential wording so the visual message remains understandable.
8. Publish with the Correct Destination
For access to Pinterest Analytics, use a business account. Pinterest offers free business accounts and supports converting an existing personal account. Its business account guide explains the options.
To create the example image Pin on desktop:
- Open Pinterest’s creation menu and choose Create Pin.
- Upload the finished image.
- Add the title and description.
- Paste the published article’s address into the Link field.
- Choose a relevant board.
- Add alt text and complete any applicable AI-content fields.
- Review the preview, then publish when everything is correct.
Pinterest documents the creation fields in its image Pin walkthrough.
For the OBS article, a board called Video Tutorials for Beginners communicates the subject more clearly than a board called Interesting Things.
Choose a board because the content belongs there. Do not force the Pin into unrelated topics.
The destination should be the article’s actual public URL. A website address printed inside the image does not replace the Link field.
Keep a copy of the design file, exported image, title, description, destination, and publication date. This makes later corrections easier.
9. Test the Journey from Pin to Article
After publishing, open the Pin and follow its destination link.
Check the journey on a phone as well as a desktop browser.
The destination should:
- Open the correct article.
- Display a heading consistent with the Pin’s promise.
- Work without requiring an administrator login.
- Keep the main text readable.
- Make the promised instructions easy to find.
If the Pin advertises an OBS recording workflow but opens a category archive, the reader has to search again. Replace the destination with the specific tutorial.
Read the article’s opening from the perspective of someone who has only seen the Pin. Does it confirm that they are in the right place?
For example, an introduction about readable screen recordings provides continuity. Several unrelated paragraphs about becoming a successful creator delay the answer the reader expected.
Pinterest allows changes to certain descriptive details after publication, but the image itself cannot be edited in place. Its creation guide explains these limits. Review spelling and composition before publishing so you do not need a replacement Pin for a simple visual correction.
10. Review the Metrics That Match Your Goal
If your goal is to introduce readers to a blog article, distinguish between activity on Pinterest and actions that lead away from it.
Pinterest defines these metrics in its Analytics documentation:
| Metric | What it tells you |
|---|---|
| Impressions | How often the Pin appeared on screen |
| Saves | How often people saved it to a board |
| Pin clicks | Clicks that opened the Pin in a close-up view |
| Outbound clicks | Actions leading to a destination outside Pinterest |
A save is not the same as an article visit. Opening the Pin is also different from following its destination.
Use these distinctions when reviewing a result.
If a Pin receives impressions but little further activity, inspect whether the subject and headline are clear. That is a hypothesis to investigate, not proof that the design caused the result.
If people open the Pin but rarely follow the link, review the promise, description, and destination. The content may satisfy their need inside Pinterest, or it may not give them a relevant reason to continue.
If people arrive at the article but struggle with the page, improve the destination as well as the Pin.
Keep your review grounded in the available evidence. One Pin does not establish what an entire audience prefers.
11. Make the Next Version Answer a Specific Question
Once the first Pin is complete, decide what you would like to learn from another version.
For example:
Does a direct tutorial headline communicate this article more clearly than a problem-focused headline?
Keep the article destination consistent and prepare one meaningful variation:
| Element | Version A | Version B |
|---|---|---|
| Image headline | Record Clear Screen Tutorials | Tiny Text in Your Screen Recordings? |
| Article destination | The OBS tutorial | The same OBS tutorial |
| Main angle | The task the reader can complete | The problem the reader recognizes |
This is an informal comparison, not a controlled experiment. Timing, distribution, and audience differences can influence results.
Record the publication dates and review comparable periods where possible. If there is very little activity, gather more evidence rather than declaring a winner.
Avoid creating a large batch of nearly identical designs before you know whether the article and its presentation are useful to the people encountering them.
Your first milestone is straightforward: one readable Pin, an accurate promise, a relevant board, and a working link to a helpful article. Build the next version around something specific you want to improve.